Two Wheel Vehicle
TwoWheelVehicle is a subclass of
EV3. You can use it for synchronized movements of
two motors. You need no knowledge of direct command syntax. Class
TwoWheelVehicle uses thread_task, which allows to move
a vehicle parallel to other activities.
TwoWheelVehicle tracks the movements of the
vehicle by tracking the motor movements of its two wheels. This allows
to ask for the current position and the current orientation of the
vehicle.
Calibration
Class TwoWheelVehicle does the tracking by frequently reading the current motor positions of both wheels and then updating the vehicle’s position. This works fine if the steps between the recalculations are small (small deltas of angle) or if the motor movements inbetween are steady. This kind of calculation needs two precise informations:
- the wheel’s radius and
- the wheel’s tread, which is the track width of the two drived wheels.
Therefore we start with two small programs, which allow to determine first the radius, then the tread.
Determine the wheel’s radius
Construct a vehicle with two drived wheels, connect your EV3 brick and your computer via WiFi, replace the MAC-address by the one of your EV3 brick, connect the left wheel motor (medium or large) with PORT A and the right wheel motor with PORT D. Measure the diameter of the drived wheels and take half of the diameter as value of radius_wheel (in meter). Then start this program.
import ev3_dc as ev3

with ev3.TwoWheelVehicle(
    0.0210,  # radius_wheel_measured
    0.1224,  # tread
    protocol=ev3.WIFI,
    host='00:16:53:42:2B:99',
) as my_vehicle:
    my_vehicle.drive_straight(2.).start(thread=False)
- Some remarks:
- If you don’t own a WiFi dongle, use protocol BLUETOOTH instead.
- If your vehicle circles clockwise on place, add
my_vehicle.polarity_right = -1to your code. - If your vehicle circles anticlockwise on place, add
my_vehicle.polarity_left = -1to your code. - If your vehicle moves backwards, add
my_vehicle.polarity_left = -1andmy_vehicle.polarity_right = -1to your code. - Measure the real distance of your vehicle’s movement, then do these steps:
- Calclulate \(radius\_wheel_{effective} = radius\_wheel_{measured} \times \frac{real\_distance}{2\,m}\).
- In the program code replace \(radius\_wheel_{measured}\) by \(radius\_wheel_{effective}\).
- Restart the program and again measure the distance of the movement. Now it should be close to \(2.00\,m\).
- The last code line looks a bit strange. First we call method
drive_straight(), which returns an object. Then we call methodstart()of this object and set its keyword argument thread to value False.
Determine the wheel’s tread
Now you know the effective radius of your vehicle’s wheels but you need to know the effective width of the vehicle’s tread too. Replace radius_wheel by your effective value, measure the track width of your vehicle and take it as the tread value, then start the following program and count the circles.
import ev3_dc as ev3

with ev3.TwoWheelVehicle(
    0.0210,  # radius_wheel
    0.1224,  # tread_measured
    protocol=ev3.WIFI,
    host='00:16:53:42:2B:99',
) as my_vehicle:
    my_vehicle.drive_turn(3600, 0.0).start(thread=False)
- Some remarks:
- The vehicle circles anticlockwise because this is the positive direction of rotation.
- 3600 degrees means 10 full circles. You will measure something
different. Multiply the number of full circles by 360 degrees and
add the fraction of the last circle (in degrees). This is the
\(real\_angle\) of the rotation. Then do:
- Calclulate \(tread_{effective} = tread_{measured} \times \frac{3600 °}{real\_angle}\).
- In the program code replace the value \(tread_{measured}\) by the value \(tread_{effective}\).
- Restart the program and again measure the total angle of the rotations. Now it should be close to 10 full circles or \(3600 °\).
- The precision depends on the tyres. If you use wheels with wide base tyres, then the calibration is less exact. From situation to situation it will be a different location of the contact face, where the grip occurs, which says: the tread width varies.
Precise Driving
Two methods drive_straight() and
drive_turn() allow to specify a
series of movements, which the vehicle will follow. Maybe you know
turtle
from the standard python library. Here is a robotic pendant.
Define a Parcours
Connect your EV3 brick and your computer via WiFi, connect the left wheel motor (medium or large) with PORT A and the right wheel motor with PORT D, replace the values of radius_wheel and tread with the values from your calibration, then start this program:
import ev3_dc as ev3

with ev3.TwoWheelVehicle(
    0.01518,  # radius_wheel
    0.11495,  # tread
    protocol=ev3.WIFI
) as my_vehicle:
    parcours = (
        my_vehicle.drive_straight(0.5) +
        my_vehicle.drive_turn(120, 0.0) +
        my_vehicle.drive_straight(0.5) +
        my_vehicle.drive_turn(120, 0.0) +
        my_vehicle.drive_straight(0.5) +
        my_vehicle.drive_turn(120, 0.0)
    )
    parcours.start(thread=False)
Some remarks:
- The parcours builds an equilateral triangle with a side length of half a meter.
- The program does not start six single movements, it instead defines a parcours and then starts the driving by starting the parcours.
- Method drive_turn is called with two arguments, the first one sets the angle, the second one the radius. Here the radius is zero, therefore the vehicle turns on place. Please replace the radius with a positive value greater than zero and start the program again.
- Positive values of drive_turn’s angle mean turn to the left, negative values mean turn to the right. Please change the signs of the three angles and start the program again. Then the triangle will be drived clockwise.
Sensor controlled Driving
This example is a more demanding one. It demontrates how to control a thread task by calling its methods stop and cont and how to do this inside a thread task.
Modify your vehicle and place an infrared sensor on it, which directs forwards. Connect the infrared sensor with port 2, then connect your EV3 brick and your computer with the WiFi and start this program:
import ev3_dc as ev3
from thread_task import (
    Task,
    Repeated,
    Periodic,
    STATE_STARTED,
    STATE_FINISHED,
    STATE_STOPPED,
)

with ev3.TwoWheelVehicle(
    0.0210,  # radius_wheel
    0.1224,  # tread
    protocol=ev3.WIFI,
    speed=40
) as vehicle:
    infrared = ev3.Infrared(ev3.PORT_2, ev3_obj=vehicle)

    parcours = (
        Repeated(
            vehicle.drive_turn(360, 0.2) +
            vehicle.drive_turn(-360, 0.2),
            num=2
        )
    )

    def keep_care():
        curr_state = parcours.state
        if curr_state == STATE_FINISHED:
            return True  # all done

        dist = infrared.distance
        if (
            curr_state == STATE_STARTED and
            (dist is not None and dist < 0.1)
        ):
            parcours.stop()
        elif (
            curr_state == STATE_STOPPED and
            (dist is None or dist >= 0.1)
        ):
            parcours.cont()

        return False  # call me again

    (
        Task(parcours.start) +
        Periodic(
            0.1,  # interval
            keep_care
        )
    ).start(thread=False)
Some remarks:
- the parcours is a lying eight, build from two circles and wrapped in a Repeated, which makes the vehicle to drive it two times. This says: the vehicle drives two times alongside a lying eight.
- function keep_care controls the vehicle’s movement and it does three things:
- it tests if the vehicle already has finished the parcours. If so, it ends the Periodic, which called it.
- it tests if the vehicle currently is driving (STATE_STARTED) though there is a barrier close in front of the sensor. If so, it stops the driving (read stopping for the details).
- it tests if the vehicle currently is stopped (STATE_STOPPED) though the infrared sensor does not see something closer than 0.1 m. If so, it lets the vehicle continue its movement (read continue for the details).
- to understand the details of function keep_care, you need to understand, how a Periodic works (read Periodic actions for the details).
- Task(parcours.start) starts the parcours in its own thread, which says: driving the parcours and reading the sensor happen parallel in different threads.
- the Periodic calls function keep_care ten times per second, which is often enough to stop the vehicle before it collides with a barrier.
Plotting the Energy Consumption
The option of doing multiple things parallel opens a lot of perspectives. As an example we track the energy consumption of a vehicle by repeatedly reading its battery state. We will realize, that the battery state is not precisely the current one, instead it shows medium values over some time, therefore the result will be not more than reasonable. This example uses module matplotlib, which you need to have installed.
Connect your EV3 brick and your computer via WiFi, connect the left wheel motor (medium or large) with PORT A and the right wheel motor with PORT D, replace the values of radius_wheel and tread with the values from your calibration, then start this program:
import matplotlib.pyplot as plt
import datetime
from thread_task import Periodic, Task, Sleep
import ev3_dc as ev3

times = []
powers = []

with ev3.TwoWheelVehicle(
    0.01518,  # radius_wheel
    0.11495,  # tread
    protocol=ev3.WIFI,
    speed=40
) as vehicle:

    def track_power():
        '''
        determine current power consumption
        '''
        battery = vehicle.battery
        times.append(datetime.datetime.now())
        powers.append(battery.voltage * battery.current)

    t_track = Periodic(0.1, track_power)

    t_parcours = (
        Sleep(5) +
        vehicle.drive_straight(0.5) +
        Sleep(5) +
        vehicle.drive_turn(120, 0.0) +
        Sleep(5) +
        vehicle.drive_straight(0.5) +
        Sleep(5) +
        vehicle.drive_turn(120, 0.0) +
        Sleep(5) +
        vehicle.drive_straight(0.5) +
        Sleep(5) +
        vehicle.drive_turn(120, 0.0) +
        Sleep(10)
    )

    (
        Task(t_track.start) +
        t_parcours +
        Task(t_track.stop)
    ).start(thread=False)

    # plot powers over times
    plt.plot(times, powers)
    plt.gcf().autofmt_xdate()
    plt.show()
Some remarks:
- The parcours includes timespans with no action. We want to see how the energy consumption differs between action and rest.
- Function track_power protocols a single datetime and power [W] in the corresponding lists times and powers.
- After started, t_track would run forever and protocol the current power consumption 10 times per second. Therefore t_track is stopped, when the vehicle finished the parcours.
- Task(t_track.start) starts t_track in its own thread. This says: t_track and t_parcours run parallel.
- This pattern is typical for executing two thread tasks parallel, when one of the thread tasks sets the timing by its duration.
My program plotted this figure:
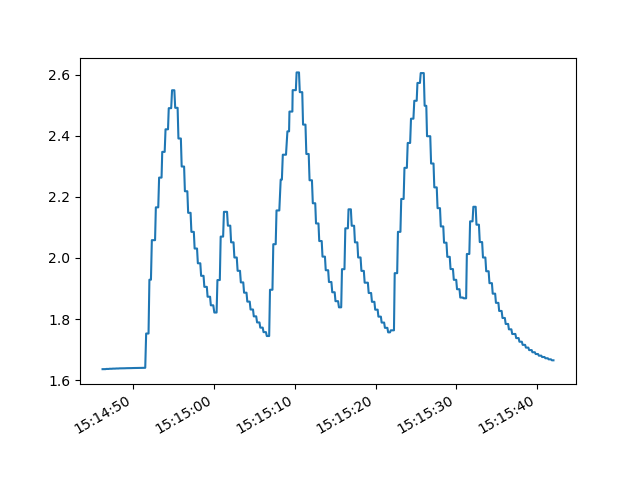
Some remarks:
- We expect the highest energy consumtion at the beginning of the movements, when the vehicle accelerates and we expect an immediate fallback to its original value, when the movements end.
- Instead we see a flattened increase and decrease with a flattening over a few seconds. We see the six movements as peaks, but the form of the peaks does not show the real energy consumption.
- Our conclusion: the battery state shows a kind of medium values over a timespan of a few seconds.
Tracking the vehicle’s Position and Orientation
Class TwoWheelVehicle tracks the vehicle’s position and orientation.
Property position tells the current
values. Alternatively, you can use
tracking_callback to handle the
information about the current position and orientation.
Print Current Position
Connect your EV3 brick and your computer via WiFi, replace the MAC-address by the one of your EV3 brick, connect the left wheel motor (medium or large) with PORT A and the right wheel motor with PORT D, replace the values of radius_wheel and tread with the values from your calibration, then start this program:
import ev3_dc as ev3

def print_position(pos: ev3.VehiclePosition) -> None:
    '''
    prints current position and orientation of the vehicle
    '''
    print(
        f'\rx: {pos.x:5.2f} m, y: {pos.y:5.2f} m, o: {pos.o:4.0f} °',
        end=''
    )

with ev3.TwoWheelVehicle(
    0.01518,  # radius_wheel
    0.11495,  # tread
    protocol=ev3.WIFI,
    host='00:16:53:42:2B:99',
    speed=20,
    ramp_up=60,
    ramp_down=60,
    tracking_callback=print_position
) as my_vehicle:
    parcours = my_vehicle.drive_turn(360, 0.2)
    parcours.start(thread=False)
    print('\n' + '-' * 14, 'done', '-' * 13)
    print(my_vehicle.position)
Some remarks:
- This parcours drives the vehicle a single cirle in anticlockwise direction.
- The vehicle’s tracking uses the middle between the two drived wheels as point of reference and measures in meters.
- The x-axes points in direction of the vehicle’s starting orientation. The y-axes points to the left of its starting orientation. The starting position is, as you may have expected, (0.0, 0.0).
- Function print_position prints the values of the x- and y-coordinates and the vehicle’s orientation whenever it is called. It repeatedly prints the same line. This is done by printing carriage return (“\r”) in front of the printed line and ending the line without a newline (“\n”).
- After the parcours has been finished, property position is printed, which demonstrates the alternative way to get the vehicle’s current position.
- This construction of the TwoWheelVehicle object uses some more keyword arguments than you have seen before. Beneath
tracking_callbackthere also is set a higherspeedand higher values forramp_upandramp_down.
Visualize the Movement
We use matplotlib to visualize the vehicle’s movement. Most of the next program are details of this tool. Some of you already know motplotlib and will find some details to modify. For some of you this will be the first contact with the tool, then take is as it is. Some of you will know the standard python turtle module and we already mentioned it. This program comes even closer to this module and will give some of you a familiar warm feeling.
You need to have matplotlib installed. If so, connect your EV3 brick and your computer via WiFi, connect the left wheel motor (medium or large) with PORT A and the right wheel motor with PORT D, replace the values of radius_wheel and tread with the values from your calibration, then start this program:
import matplotlib.pyplot as plt
import ev3_dc as ev3

plt.ion()
fig, ax = plt.subplots()
ax.figure.set_size_inches(5, 5)
ax.grid(True)

ax.set_xlim([-1.1, 1.1])
ax.set_xticks([-1, -0.5, 0.5, 1])
ax.spines['left'].set_position('zero')
ax.spines['right'].set_color('none')

ax.set_ylim([-1.1, 1.1])
ax.set_yticks([-1, -0.5, 0.5, 1])
ax.spines['bottom'].set_position('zero')
ax.spines['top'].set_color('none')

x_values = [0.0,]
y_values = [0.0,]
pos = ax.plot(0.0, 0.0, 'ro')[0]
line = ax.plot(x_values, y_values, 'r-')[0]
fig.canvas.draw()

def plot_curr_pos(curr_pos: ev3.VehiclePosition):
    '''
    updates pos in plot
    '''
    x_values.append(curr_pos.x)
    y_values.append(curr_pos.y)
    line.set_xdata(x_values)
    line.set_ydata(y_values)
    pos.set_xdata(curr_pos.x)
    pos.set_ydata(curr_pos.y)
    fig.canvas.flush_events()

with ev3.TwoWheelVehicle(
    0.01518,  # radius_wheel
    0.11495,  # tread
    protocol=ev3.WIFI,
    speed=50,
    tracking_callback=plot_curr_pos
) as vehicle:
    parcours = (
        vehicle.drive_straight(0.5) +
        vehicle.drive_turn(270, 0.5) +
        vehicle.drive_straight(1.0) +
        vehicle.drive_turn(-270, 0.5) +
        vehicle.drive_straight(0.5)
    )
    parcours.start(thread=False)
Some remarks:
- The program consists of three parts. The first does the setup of the plot, the second defines a function plot_curr_pos, which updates the plot and the last part lets the vehicle drive a parcours.
- Setting keyword argument tracking_callback=plot_curr_pos is an important detail. This tells the
TwoWheelVehicleobject to call function plot_curr_pos whenever it reads the current position of the vehicle’s motors.- The parcours lets the vehicle drive a lying eight and start from the figure’s center. It starts driving alongside the x-axis. After half a meter it turns 270 ° to the left side until it reaches the y-axis, etc.
- Play around and modify the parcours. Let the vehicle drive your geometric favorites.
Regulated Movements
A parcours, which the vehicle follows, is one option for driving a
vehicle. Another option are regulated movements, where sensors or a
person take over the vehicle’s control. In a car the instruments of
regulation are the steering wheel, the gas pedal and others. Class
TwoWheelVehicle provides method
move() for this and method move
knows only two arguments, speed and turn. The sign of argument speed
sets the movement’s direction (forwards or backwards). Argument turn
is a bit more complicated. It may vary between -200 and 200. Here are
explanations for some special values of turn:
- -200: circle right on place
- -100: turn right with unmoved right wheel
- 0: straight
- 100: turn left with unmoved left wheel
- 200: circle left on place
Now let’s demonstrate it with a program. Connect your EV3 brick and your computer via WiFi, replace the MAC-address by the one of your EV3 brick, connect the left wheel motor (medium or large) with PORT A and the right wheel motor with PORT D, replace the values of radius_wheel and tread with the values from your calibration, then start this program in a terminal (not in an interactive python shell):
import curses
import ev3_dc as ev3


def main(stdscr) -> None:
    '''
    controls terminal and keyboard events
    '''
    def react():
        '''
        reacts on keyboard arrow key events by modifying speed and turn
        '''
        nonlocal speed, turn
        if c == curses.KEY_LEFT:
            turn += 5
            turn = min(turn, 200)
        elif c == curses.KEY_RIGHT:
            turn -= 5
            turn = max(turn, -200)
        elif c == curses.KEY_UP:
            speed += 5
            speed = min(speed, 100)
        elif c == curses.KEY_DOWN:
            speed -= 5
            speed = max(speed, -100)

    # initialize terminal

    stdscr.clear()
    stdscr.refresh()
    stdscr.addstr(0, 0, 'use Arrows to navigate your vehicle')
    stdscr.addstr(1, 0, 'pause your vehicle with key <p>')
    stdscr.addstr(2, 0, 'terminate with key <q>')

    # control vehicle movement and visualize it

    speed = 0
    turn = 0
    with ev3.TwoWheelVehicle(
        0.01518,  # radius_wheel
        0.11495,  # tread
        protocol=ev3.WIFI,
        host='00:16:53:42:2B:99'
    ) as my_vehicle:
        while True:
            c = stdscr.getch()  # catch keyboard event
            if c in (
                curses.KEY_RIGHT,
                curses.KEY_LEFT,
                curses.KEY_UP,
                curses.KEY_DOWN
            ):
                react()
                my_vehicle.move(speed, turn)  # modify movement
                stdscr.addstr(
                    4,
                    0,
                    f'speed: {speed:4d}, turn: {turn:4d}          '
                )
            elif c == ord('p'):
                speed = 0
                turn = 0
                my_vehicle.stop()  # stop movement
                pos = my_vehicle.position
                stdscr.addstr(
                    4,
                    0,
                    f'x: {pos.x:5.2f} m, y: {pos.y:5.2f} m, o: {pos.o:4.0f} °'
                )
            elif c in (ord('q'), 27):
                my_vehicle.stop()  # finally stop movement
                break

curses.wrapper(main)
Some remarks:
- This program is a simple remote control, that uses the arrow keys of the terminal to modify the vehicle’s movement. Key <p> pauses the movement, key <q> quits it.
- Python standard module curses is kind of old-fashioned because it uses a terminal instead of a graphical interface.
- curses takes the control over the terminal and the keyboard. With stdscr.getch() it catches the keyboard events and reacts on the arrow keys.
- Function react does the real stuff. It modifies either speed or turn.
- This program uses two methods of class TwoWheelVehicle: move and stop.
- Method move is called whenever an array key event occurs. The next movement replaces (or interrupts) the last one.
- The movement seems to be smooth even when speed and turn change in steps of 5.
- Whenever the movement pauses, the program shows the vehicle’s current position, which demonstrates, that the tracking works with regulated movements too.